-1.png?height=120&name=yoello%20(grey)-1.png)
This guide will provide you with step-by-step instructions on how to set up your Bill Pay system
When you have successfully downloaded the Epos Now Bill Pay app from the Epos Now app store, you will receive an initial email from support@yoello.com, where it will ask you to Log In using the email address and temporary password provided.
Once you have successfully logged into app.yoello.com (your new Bill Pay dashboard), you will be asked to continue with account setup. Below will go through the initial setup process.
Note: If you have previously signed in using our Order & Pay product, you will instead be asked to login using your Order & Pay credentials. If you have forgotten your password, please select 'Forgotten your password?'
Contents of Set Up Guide:
- Initial Setup Process
- Create your business account
- Add Payment Method
- Payment Requests
- Add a new account image
- User Management
- Contact Us
- Open the email sent by support@yoello.com titled 'Welcome to Epos Now Bill Pay'
- Log in to the Bill Pay Dashboard app.yoello.com to start the account setup process.
- If you have received a temporary password to log in, please input it into the Bill Pay Dashboard, then it will prompt you to set a new password.
- Create your new user profile (inputting the required information). This is where your Bill Pay accounts will be visible. Initial information required for your profile setup:
- First Name
- Last Name
- Phone Number
- Email Address
- Click 'Sign Up'

Once you have created your profile, and signed in successfully for the first time, it will ask you to create your business account.
-
Select what type of business you are
- Sole Trader - You're self employed and operate under your own name
- Limited Company - The company has a registration number and operates as a legal entity
-
Enter your business details
- Company/business name - your registered company name
- Trading Name (if different) - the name of your venue that your customers know it by
- Location - the country your business is located
- Industry - select from the options Hospitality, Retail or Other
- Category - this will list the different types of businesses for the industry you have selected
-
Create your handle
-
-
Create a unique username for your account that will be visible to others.
-
Caution: this will be your unique identifier for your business, please make it customer friendly as it will be visible when customers pay their bill.
Note: Handles can be up to 30 characters and can include letters (a-z, A-Z), numbers (0-9), underscores (_) and periods (.). Underscores (_) & periods (.) can't be used at the start or end of the handle.
And then...

To set up card payments on your account, to allow your customer to make digital payments (via Card, Apple Pay and Google Pay), please click through to the 'Set up card payments' guidance.
Click here for help on setting up your card payments

In order for your customers to be able to find the bill and pay, you will first need to sync your till table plan over from you back office. This is a very easy step, and can be done with just the click of a button on the Bill Pay Dashboard. Please click through to the 'Payment Requests (POS Users)' guidance.
Click here for help on setting up your payment requests

This is where you get to show off your venue to your customers. It is really important that this image gives a snapshot of your business, giving your customer confidence to use this method for payment.
- Click the '+' in the circle at the top of the business account page
- Windows Explorer / Finder will open where you will be asked to upload a new image
- Click the relevant button on your computer to open/upload the image
- Crop the image
- Press 'Submit'
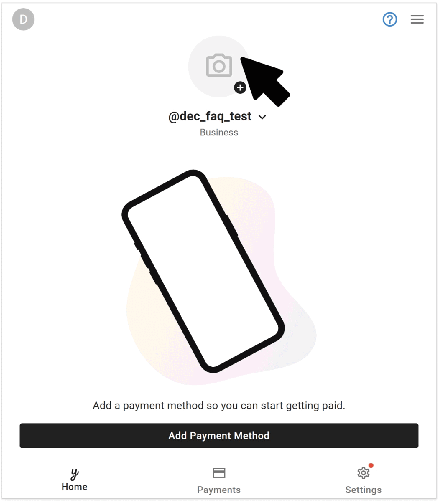
Note: if you have uploaded an image and want to change it, you can do that by clicking the image, then selecting 'Select New Account Image'

Our permission system allows you to control which staff can access your business account. All you need to do is input the staff members email account on your Bill Pay dashboard.
Please click through to the 'User Management' guidance.
Click here for help on User Management
Contact Us
If you need help with any of your Bill Pay setup, please contact the Epos Now Support team.
Contact Number: 0800 2 945 945
Submit a support query: Submit a Support Request