-1.png?height=120&name=yoello%20(grey)-1.png)
This guide will provide you with step-by-step instructions on how to set up your Online Ordering system
When you have successfully downloaded the Epos Now Online Ordering app from the Epos Now app store, you will receive an initial email from support@yoello.com, where it will ask you to Log In using the email address and temporary password provided.
Once you have successfully logged into eposnow.yoello.com (your new Online Ordering merchant dashboard), you will be asked to continue with the account setup. Below will go through the initial setup process.
Note: If you have previously signed in using our Pay at Table or Bill Pay product, you will instead be asked to log in using those credentials for your Online Ordering account as well. If you have forgotten your password, please select 'Forgotten your password?'
Contents of Set Up Guide:
-
Set up your Epos Now till (skip if already trading with Epos Now)
-
Step 1: Details - complete the required fields marked with '*'
-
Step 3: Products - sync your menu to import products and create your online menu
- Step 4: Sales Taxes - set up your sales taxes
-
Step 5: Settings - enable at least 1 order type, set trading times and upload your venue images
-
Step 6: QR Code - complete your Venue URL to create your QR Code
- Set Up Automatic Web Order Printing
ℹ️ Skip this step if you are already set up and trading with Epos Now
If you are new to Epos Now, you will need to complete your till set-up before you can get started with Online Ordering. In order to do this, you will need to speak to the support team who will assist you with getting this setup, you can call them on 0800 2 945 945.
< back to 'Contents of Set Up Guide'
 Complete the required fields marked with '*'
Please complete as much information as possible. The fields marked with an '*' are mandatory, you cannot proceed with your venue set-up until these fields have been completed.
Required fields:
Please note: your Venue Name and Description are automatically pulled across from the Epos Now back office, and it may not be customer friendly. Please review your Venue Name and Description fields on the Details tab, and edit them if necessary (don't forget to press 'Save Changes').
< back to 'Contents of Set Up Guide'

To set up card payments on your account, to allow your customers to make digital payments (via Card, Apple Pay and Google Pay), please click through to the 'Set up card payments' guidance.
Click here for help on setting up your payments
< back to 'Contents of Set Up Guide'

Sync your menu to import products and create your online menu
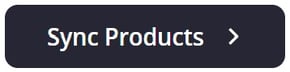
1) Sync your menu to import products
As an Epos Now customer, you have access to the Epos Now tab on the merchant dashboard which allows you to sync your products from your back office.

When you press the 'Sync Products' button, ALL of your products in your Epos Now Back Office will be imported and synced to your Merchant Dashboard. However, for the import to be successful, you will need to make sure that the products you wish to sync have the following criteria set:
- The product has a Category
- The product is NOT archived
Tip: you can add descriptions and images to items within the Products > Items section of the merchant dashboard. To edit an item, click on it, make the required changes, then press 'Submit'.
2) Create your menus
Set up different menus and manage how customers are able to view your products
For items to appear to your customers, they must be placed within a menu and ticked as 'In Stock'.
Creating a new menu:
- Click on the ‘Create New Menu’ button.
- Give your menu a name as you want it to appear to your customers e.g. Food Menu, Drink Menu, Breakfast Menu, Lunch Menu, Wine List etc.
- Enable your menu if you want it to be visible to your customers right away.
- Give your menu a description (this is not a required field)
- Select which items you want to be part of this menu (Items must be added to a menu before the menu can be created).
- You can utilise the Filter functionality to add to menus based on subcategories. (For example, within the selector, you can filter 'Ice Cream' and press 'Select All' and then add all the products within that subcategory to your new menu.)
Please see the video below for further information:
Please go to our How do I set up a menu? article if you would like to find out more about the functionality of the menu section.
If you want to find out how to sync extras (multiple-choice product groups / MCPs), please go to Epos Now: How do I sync extras (multiple-choice product groups)
< back to 'Contents of Set Up Guide'
Your taxes will pull across from your Epos Now back office to the Merchant Dashboard after you have performed a menu sync (by pressing 'Sync Products' in the Epos Now tab).
We DO NOT apply taxes to Service Fees or Delivery Charges automatically.
If you want to apply taxes to Service Fees and/or Delivery Charges, you can do this on the Merchant Dashboard.
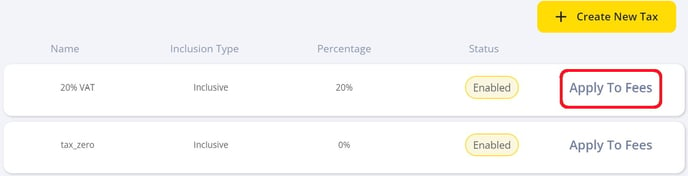
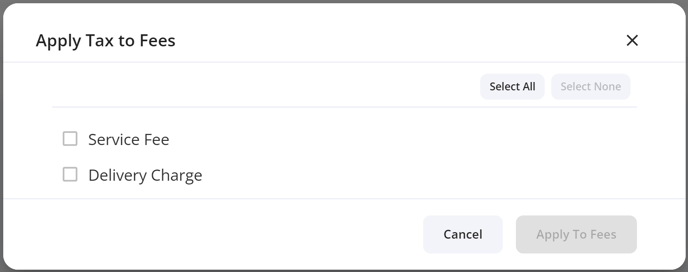
How to apply a tax to your Service Fees and/or Delivery Charges:
- Go to 'Sales Taxes' on the Merchant Dashboard
- Click 'Apply To Fees' on the relevant tax you want to add to your Service Fees and/or Delivery Charges
- Select whether to apply to Service Fees and/or Delivery Charges
- Click 'Apply To Fees'
< back to 'Contents of Set Up Guide'

Enable at least 1 order type, set trading times and upload your venue images
This part has 5 sections that require your input.
At a minimum, you will need to complete 2 of these sections to allow you to trade, ‘Enable at least 1 Order Type’ and ‘Set your trading times’
1) Trading Times
You will need to create your trading times before your customers can order from your venue. To create these, go to Settings > Trading Times on the merchant dashboard, click ‘Add New Trading Times’, then click the days of the week you want that timing to apply for, add the trading hours, and enter the Name of the created trading time (e.g. Standard Opening Hours).
You can have as many trading times as you want (you are unable to delete them once created). Please make sure that when you have created your trading time, you set them to 'Active' using the toggle.
Please note: the time selector is in the 24-hour format. 00:00 is midnight, and 12:00 is noon. DO NOT have a venue open 12:00-00:00 as this will not open your venue.
2) Venue Settings
Within this section, you can control your Venue Visibility, Venue Fees, and Reviews.
⚙️ Venue Visibility
To allow customers to order from the platform, you must turn your venue visibility to 'Enabled'.
Caution: this section will override any trading times. So if you turn this off during service, then customers will no longer be able to order from your venue, and the venue status will update to 'Closed'.
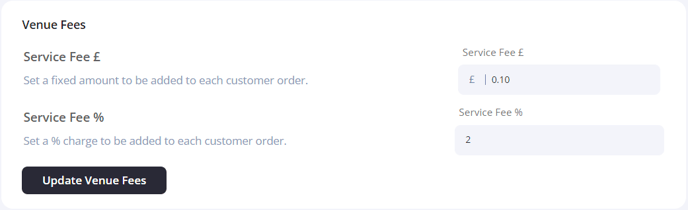
⚙️ Venue Fees
This is where you can set a service charge amount and/or percentage to be applied to each order that is placed.
These settings are fully customisable so you have control over what you wish to charge your customers. For example, you may wish to charge your customers for placing orders using the QR Code and therefore offset the costs incurred by yourself running the Online Ordering service.
Please note: if you leave both 'Service Fee’ and ‘Service Fee %’ empty, you will be absorbing the transaction fee (charged by Yoello) on behalf of your customers.
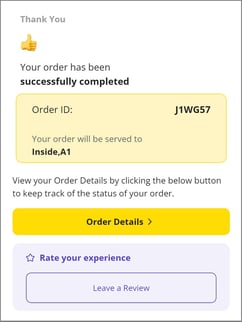
⚙️ Reviews
If you would like customers to leave a review after they have purchased from your venue, you can allow them to do it here by clicking 'Enabled' in the Reviews section.
If you turn Reviews on, this is how it will look to your customers after they have made a payment.
Please note: If you enable Reviews, they are NOT public reviews. Only you and your staff will be able to see the reviews that your customers have left. If enabled, you can see your reviews in the merchant dashboard section 'Reviews'. You will also be provided with your customer's contact information within the review if you wish to contact them about their review.
3) Order Settings
Please read this article about Order Settings: Updating your Order Settings
4) Venue Images
Upload images to appear on the landing page of your Yoello platform and bring it to life for your customers!
📸 Upload Venue Logo
This image must be square. We recommend using the following dimensions (1080 pixels x 1080 pixels) or scale size 1:1.
📸 Upload Venue Banner
This must be rectangular. We recommend using a photo to fill this space rather than an image with text to avoid distortion. We recommend using the following dimensions (991 pixels x 594 pixels).
Tip: You can resize your images using https://picresize.com
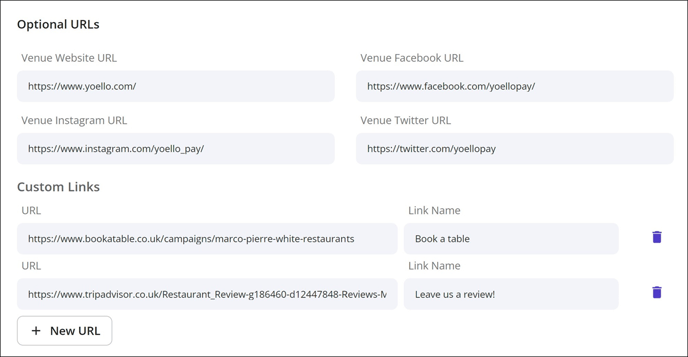
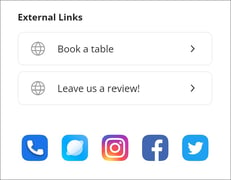
5) External Links
You can add external links to your Online Ordering customer-facing page.
We have sections to add a Website URL, Facebook URL, Instagram URL, and an X (formerly Twitter) URL. Once inputted, these social media company logos will appear at the bottom of your consumer site, for customers to click on to be redirected to your social sites.
Example - how it looks on the merchant dashboard
Example - how it looks on the customer-facing app
Warning: Please make sure you always add the https:// or http:// domain at the beginning of the URL. This is easiest if you simply copy the URL from the internet address bar and paste it here.
< back to 'Contents of Set Up Guide'
 At this step, this is where you set your venue URL and can download your unique QR code.
Go to QR Code > Venue URL on the merchant dashboard to create a URL.
Important: In order for your customers to access your online Online Ordering venue, you must generate your URL.
Your Venue URL has to be unique, cannot be longer than 13 characters and must be formatted as letters, digits, ‘-’ or ‘_’, and with no spaces.
Your URL will appear as: pay.yoello.com/v/[yourvenuenickname]
- For example, if your venue is called The Secret Garden, you may choose to have ‘secretgarden’ or 'secret_garden' as your Venue URL.
- Once you have saved your Venue URL you will not be able to change it.
- Click Download QR Code and you will download a PNG file of your QR code.
- The QR Code can also be downloaded to include the outline of a plaque design with your venue logo included.
< back to 'Contents of Set Up Guide'
You can set up your Epos Now till to enable your Web Orders to print automatically on your printers.
Tip: We recommend setting this up outside of trading hours, as when you first set up the printing capability it may print old orders that may confuse staff if this happens whilst trading.
First, check what type of till you have - Android or Windows?
- Windows - your till will have the clock in the bottom right corner of the desktop, as well as the Windows icon in the bottom left corner. If you are using a Windows till there will also be a Windows symbol in one of the corners of the main screen on the EPOS till.
- Android - your till will have the clock in the top right corner of the screen.
You will only need to set it up on only ONE till in your venue. If you have multiple tills please just set it up on one per Epos Now location, or it will cause multiple tickets to print.
.svg.png?width=80&height=70&name=Android_logo_2019_(stacked).svg.png)
If you are using an ANDROID till - click here to download a guide on how to set up Order Utility on your till.
If you are using a WINDOWS till - click here to download a guide on how to set up Windows Order Utility on your till
If you need to speak with Epos Now about till support they can be contacted via live chat at https://www.eposnow.com/uk/contact-us/support/ or by UK phone: +44 800 2 945 945
< back to 'Contents of Set Up Guide'
Contact Us
If you need help with any of your Online Ordering setup, please contact the Epos Now Support team.
Contact Number: 0800 2 945 945
Submit a support query: Submit a Support Request